Apple OSX 10.2 has built-in VPN capabilities using the application Internet Connect. This paper discusses how to configure a Netopia router so that it will accept connections from OSX Internet Connect.
 The Netopia R9100 is an inexpensive, versatile, and powerful router. It connects to the internet via an ethernet cable, so it attaches to your internet access provider's DSL modem, cable modem, or other equipment. This keeps the router functions seperate from your internet service provider's equipment and helps keep finger-pointing to a minimum if problems with connectivity occur. This also allows you to keep your router if you change internet service providers.
If you want to configure the router to accept VPN connections from a Windows computer, see Installing and Configuring a VPN for PPTP Client to an R-series Router.
This configuration assumes that your router has a static IP address and the remote user will be connecting from a dynamic IP address.
Depending on the model and firmware of your Netopia router, the menus may slightly vary.
|
Telnet into the router and select WAN Configuration from the Main Menu. |
 |
|
Select Add Connection Profile from the menu. |
 |
|
Change the values on this screen to those shown, then select Data Link Options. Use PPTP for Data Link Encapsulation. The profile name is only used by the router to display a list of connection profiles; you can name it anything. |
 |
|
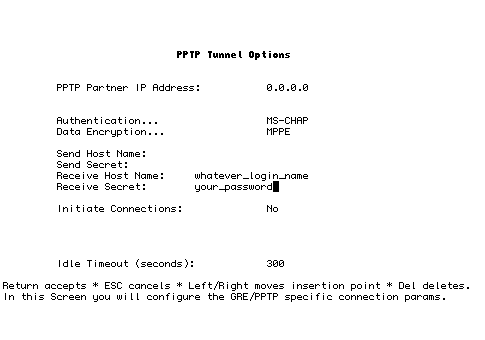
Change the values on this screen those shown, then press the ESCAPE key to return to the Add Connection Profile screen. Use MS-CHAP for authentication and MPPE for data encryption. Whatever you enter in the Receive host Name field will be the name used in Internet Connect. Whatever you enter in the Receive Secret field will be the password used in Internet Connect.
|
 |
|
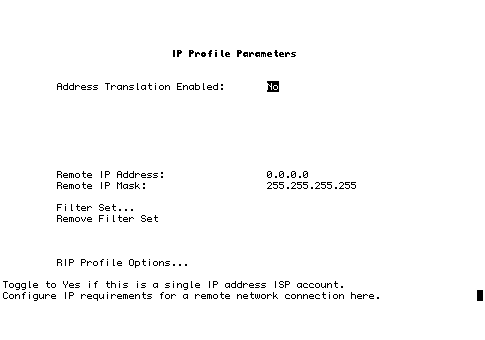
From the Add Connection Profile screen, selectIP Profile Parameters. Change the values on this screen those shown, then press the ESCAPE key to return to the Add Connection Profile screen. Select Commit to save this connection profile. |
 |
|
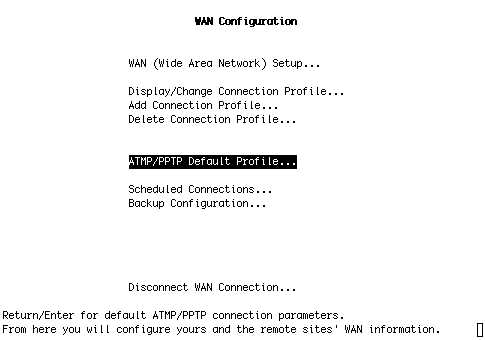
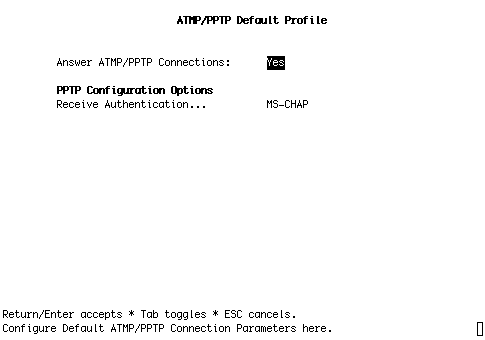
In order for the router to accept connections, a default profile must be set. From the WAN Configuration screen, selectATMP/PPTP Default Profile. |
 |
|
Change the values on this screen those shown, then press the ESCAPE key twice to return to the main menu. The router will now accept connections from OSX 10.2 Internet Connect. |
 |
|
If you want to have multiple users able to remotely connect, repeat this process for each user. |
|
|
To establish the VPN using Internet Connect, connect to the internet on the remote computer. It does not matter if the connection is via modem, ethernet or whatever, as long as a connection to the internet is made. Open Internet Connect. You can find this application in the Applications folder. From the File menu, select New VPN Connection Window. Enter your information and select the Connect button.
|
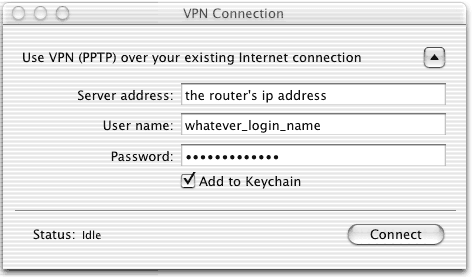 |
All TCPIP network traffic will now be channelled through the VPN to the router. TCPIP services will work just as if you were plugged-in to an ethernet jack at work.